在python-pptx中合并单元格,首先要获取一个_Cell对象,然后调用它的merge()方法进行合并,该方法的参数也是一个_Cell对象,则这两个_Cell对象对角线之间的矩形区域都会被合并,且被合并的那些单元格的文本数据会按从左到右、从上到下的顺序迁移到合并之后的单元格里。
为了方便观察,先制造一些数据,在4行3列的表格中按照顺序依次填充数字,代码如下:
from pptx import Presentationfrom pptx.util import Cmppt = Presentation()slide = ppt.slides.add_slide(ppt.slide_layouts[6])table = slide.shapes.add_table(4,3,Cm(3),Cm(3),Cm(20),Cm(10)).tablei = 1for row in table.rows:for cell in row.cells:cell.text = str(i)i += 1ppt.save("./ppt_ files/test.pptx")
现在我们把坐标为(0,1)和坐标为(2,2)的两个单元格进行合并,这两个单元格对角线形成的矩形区域内的所有单元格都会被合并,代码如下:
from pptx import Presentationfrom pptx.util import Cmppt = Presentation()slide = ppt.slides.add_slide(ppt.slide_layouts[6])table = slide.shapes.add_table(4,3,Cm(3),Cm(3),Cm(20),Cm(10)).tablei = 1for row in table.rows:for cell in row.cells:cell.text = str(i)i += 1c1 = table.cell(0,1)c2 = table.cell(2,2)print(c1.is_merge_origin) # 输出:Falseprint(c2.is_spanned) # 输出:Falseprint(table.cell(1,1).is_spanned) # 输出:False# 合并单元格c1.merge(c2)print(c1.is_merge_origin) # 输出:Trueprint(c2.is_spanned) # 输出:Trueprint(table.cell(1,1).is_spanned) # 输出:Trueppt.save("./ppt_ files/test.pptx")
我们把合并单元格前后的表格进行对比就很容易看出效果了,如图8-12所示。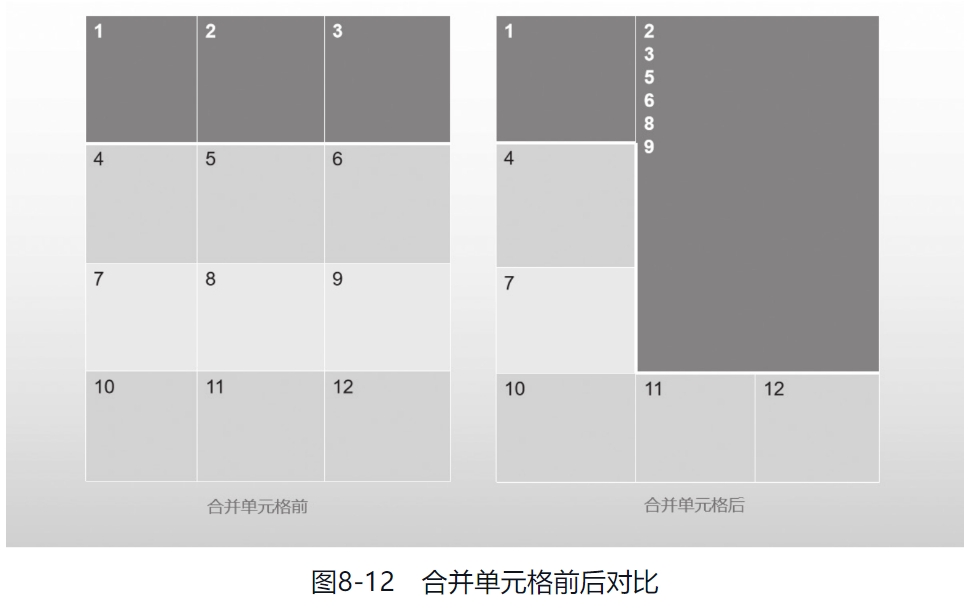
在代码中,访问了_Cell对象的is_merge_origin属性和is_spanned属性,这两个属性返回的都是布尔值,前者表示是否合并过其他单元格,后者表示是否被合并过。