<h5 style="color:red;">系统学习magento二次开发,推荐小册:<a style="color:blue;" href="https://www.maxiaoke.com/manual/magento_cn_dev.html" target="_blank">《Magento中文全栈二次开发 》</a></h5> <div class="image-container"> <p> <a style="color:blue;" href="https://www.maxiaoke.com/manual/magento_cn_dev.html" target="_blank"> <img src="https://www.maxiaoke.com/uploads/images/20230218/bb9c82995c24d1105676e02f373755f5.jpg" alt="Magento中文全栈二次开发"> </a> </p> </div> <div class="text-container" style="font-size:14px; color:#888"> <p>本小册面向Magento2以上版本,书代码及示例兼容magento2.0-2.4版本。涵盖了magento前端开发,后端开发,magento2主题,magento2重写,magento2 layout,magento2控制器,magento2 block等相关内容,带领您成为magento开发技术专家。</p> </div> <hr><p><span style="text-wrap: nowrap;">UpgradeSchema脚本用于创建新表或向现有表添加列。.</span></p><p><span style="text-wrap: nowrap;">假设它在每次setup:upgrade上运行,其中setup_module.schema_version低于<VendorName>/<ModuleName>/etc/module.xml下的setup_version,</span></p><p><span style="text-wrap: nowrap;">我们负责控制特定版本的代码。这通常是通过if-ed-version_compare方法来完成的。</span><span style="text-wrap: nowrap;">为了更好地演示这一点,让我们创建<MAGELICIOUS_DIR>/Core/Setup/UpgradeSchema.phpfile,其中包含以下内容:</span></p><pre class="brush:bash;toolbar:false">use\ Magento\ Framework\ Setup\ UpgradeSchemaInterface; use Magento\ Framework\ Setup\ ModuleContextInterface; use Magento\ Framework\ Setup\ SchemaSetupInterface; class UpgradeSchema implements UpgradeSchemaInterface { public function upgrade(SchemaSetupInterface $setup, ModuleContextInterface $context) { $setup - > startSetup(); if (version_compare($context - > getVersion(), '2.0.2') < 0) { $this - > upgradeToVersionTwoZeroTwo($setup); } $setup - > endSetup(); } private function upgradeToVersionTwoZeroTwo(SchemaSetupInterface $setup) { echo 'UpgradeSchema->upgradeToVersionTwoZeroTwo()'.PHP_EOL; } }</pre><p><span style="text-wrap: nowrap;">这里的if-ed-version_compare如下:如果当前模块版本等于2.0.2,则执行upgradeToVersionTwoZeroTwo方法。</span></p><p><span style="text-wrap: nowrap;">如果我们要发布模块的更新版本,我们需要正确地提升<VendorName>/<ModuleName>/etc/module.xml的setup_version,否则UpgradeSchema就没有多大意义。</span></p><p><span style="text-wrap: nowrap;">同样,我们应该始终确保针对特定的模块版本,从而避免在每次版本更改时执行代码。</span></p><p><span style="text-wrap: nowrap;"></span></p><p><span style="text-wrap: nowrap;">当涉及到UpgradeSchema脚本时,数据库适配器实例的以下方法以及前面提到的方法将是令人感兴趣的:</span><span style="text-wrap: nowrap;">dropColumn:从表中删除列</span></p><p><span style="text-wrap: nowrap;"><br/></span></p><p><span style="text-wrap: nowrap;">dropForeignKey:从表删除外键</span></p><p><span style="text-wrap: nowrap;">dropIndex:从表上删除索引</span></p><p><span style="text-wrap: nowrap;">dropTable:从数据库中删除表</span></p><p><span style="text-wrap: nowrap;">ModifyColumn:修改列定义</span></p><p><span style="text-wrap: nowrap;"></span><br/></p><p><br/></p>
文章列表
<h5 style="color:red;">系统学习magento二次开发,推荐小册:<a style="color:blue;" href="https://www.maxiaoke.com/manual/magento_cn_dev.html" target="_blank">《Magento中文全栈二次开发 》</a></h5> <div class="image-container"> <p> <a style="color:blue;" href="https://www.maxiaoke.com/manual/magento_cn_dev.html" target="_blank"> <img src="https://www.maxiaoke.com/uploads/images/20230218/bb9c82995c24d1105676e02f373755f5.jpg" alt="Magento中文全栈二次开发"> </a> </p> </div> <div class="text-container" style="font-size:14px; color:#888"> <p>本小册面向Magento2以上版本,书代码及示例兼容magento2.0-2.4版本。涵盖了magento前端开发,后端开发,magento2主题,magento2重写,magento2 layout,magento2控制器,magento2 block等相关内容,带领您成为magento开发技术专家。</p> </div> <hr><p><span style="text-wrap: nowrap;">当我们希望向现有表添加新列或创建新表时,将使用InstallSchema脚本。此脚本仅在启用模块时运行。</span></p><p><span style="text-wrap: nowrap;">一旦启用,模块就会在setup_module.schema_version表列下获得相应的条目。</span></p><p><span style="text-wrap: nowrap;">此条目阻止InstallSchema脚本在模块的setup_version保持不变的任何后续setup:upgrade命令上运行。</span></p><p><span style="text-wrap: nowrap;">让我们继续创建<MAGELICIOUS_DIR>/Core/Setup/InstallSchema.php文件,其中包含以下内容:</span></p><pre class="brush:bash;toolbar:false">use\ Magento\ Framework\ Setup\ InstallSchemaInterface; use Magento\ Framework\ Setup\ ModuleContextInterface; use Magento\ Framework\ Setup\ SchemaSetupInterface; class InstallSchema implements InstallSchemaInterface { public function install(SchemaSetupInterface $setup, ModuleContextInterface $context) { $setup - > startSetup(); echo 'InstallSchema->install()'.PHP_EOL; $setup - > endSetup(); } }</pre><p><span style="text-wrap: nowrap;">使用$setup->startSetup();和$setup->endSetup();是大多数设置脚本中的常见做法。</span></p><p><span style="text-wrap: nowrap;">这两种方法的实现涉及运行额外的环境设置步骤,例如设置SQL_MODE和FOREIGN_KEY_CHECKS,如在Magento\Framework\DB\Adapter\Pdo\Mysql下所示。</span></p><p><span style="text-wrap: nowrap;">为了从中获得有用的东西,让我们继续使用实际创建我们的magelicious_core_log表的代码来替换echo行:</span></p><pre class="brush:bash;toolbar:false"><br/></pre><pre class="brush:bash;toolbar:false"><?php $table = $setup->getConnection()->newTable($setup->getTable('magelicious_core_log')) ->addColumn('entity_id', \Magento\Framework\DB\Ddl\Table::TYPE_INTEGER, null, ['identity' => true, 'unsigned' => true, 'nullable' => false, 'primary' => true], 'Entity ID') ->addColumn('severity_level', \Magento\Framework\DB\Ddl\Table::TYPE_TEXT, 24, ['nullable' => false], 'Severity Level') ->addColumn('note', \Magento\Framework\DB\Ddl\Table::TYPE_TEXT, null, ['nullable' => false], 'Note') ->addColumn('created_at', \Magento\Framework\DB\Ddl\Table::TYPE_TIMESTAMP, null, ['nullable' => false], 'Created At') ->setComment('Magelicious Core Log Table'); $setup->getConnection()->createTable($table);</pre><p><span style="text-wrap: nowrap;">$setup->getConnection()为我们获取数据库适配器实例。从那时起,我们可以访问创建数据库表所需的方法。</span></p><p><span style="text-wrap: nowrap;">当涉及到InstallSchema脚本时,大多数情况下,以下方法可以完成任务:</span></p><p><br/></p><p><span style="text-wrap: nowrap;">newTable:为新表检索DDL对象</span></p><p><span style="text-wrap: nowrap;">addColumn:向表中添加列</span></p><p><span style="text-wrap: nowrap;">addIndex:向表添加索引</span></p><p><span style="text-wrap: nowrap;">addForeignKey:向表添加外键</span></p><p><span style="text-wrap: nowrap;">comment:为表设置注释</span></p><p><span style="text-wrap: nowrap;">createTable:从DDL对象创建表此处的magelicious_core_log表本质上是magelicious\core\Model\log简单模型后面的存储。</span></p><p><span style="text-wrap: nowrap;">如果我们的模型是EAV模型,我们将使用相同的InstallSchema脚本来创建如下表:</span></p><p><span style="text-wrap: nowrap;"><br/></span></p><p><span style="text-wrap: nowrap;">log_entity</span></p><p><span style="text-wrap: nowrap;">log_entity_datetime</span></p><p><span style="text-wrap: nowrap;">log_entity_decimal</span></p><p><span style="text-wrap: nowrap;">log_entity_int</span></p><p><span style="text-wrap: nowrap;">log_entity_text</span></p><p><span style="text-wrap: nowrap;">log_entity_varchar</span></p><p><span style="text-wrap: nowrap;"><br/></span></p><p><span style="text-wrap: nowrap;"></span></p><p><span style="text-wrap: nowrap;">然而,在EAV模型的情况下,实际的属性severity_level和note可能会通过InstallData脚本添加。</span></p><p><span style="text-wrap: nowrap;">这是因为属性定义本质上是eav_attribute_*表下的数据,主要是eav_attribute表。</span></p><p><span style="text-wrap: nowrap;">因此,属性是在InstallData和UpgradeData脚本内部创建的。</span></p><p><br/><span style="text-wrap: nowrap;"></span></p>
<h5 style="color:red;">系统学习magento二次开发,推荐小册:<a style="color:blue;" href="https://www.maxiaoke.com/manual/magento_cn_dev.html" target="_blank">《Magento中文全栈二次开发 》</a></h5> <div class="image-container"> <p> <a style="color:blue;" href="https://www.maxiaoke.com/manual/magento_cn_dev.html" target="_blank"> <img src="https://www.maxiaoke.com/uploads/images/20230218/bb9c82995c24d1105676e02f373755f5.jpg" alt="Magento中文全栈二次开发"> </a> </p> </div> <div class="text-container" style="font-size:14px; color:#888"> <p>本小册面向Magento2以上版本,书代码及示例兼容magento2.0-2.4版本。涵盖了magento前端开发,后端开发,magento2主题,magento2重写,magento2 layout,magento2控制器,magento2 block等相关内容,带领您成为magento开发技术专家。</p> </div> <hr><p><span style="text-wrap: nowrap;">EAV和简单模型都是从Magento\Framework\Model\AbstractModel类扩展而来的,该类进一步扩展了Magento\ Framework\DataObject。</span></p><p><span style="text-wrap: nowrap;">DataObject有一些巧妙的方法值得记住。</span></p><p><span style="text-wrap: nowrap;">以下一组方法用于处理数据转换:</span><span style="text-wrap: nowrap;">toArray:将对象数据的数组转换为$keys数组中请求的具有键的数组</span></p><p><span style="text-wrap: nowrap;">toXML:将对象数据转换为XML</span></p><p><span style="text-wrap: nowrap;">toJson:将对象数据转化为JSON</span></p><p><span style="text-wrap: nowrap;">toString:将对象数转换为具有预定义格式的字符串</span></p><p><span style="text-wrap: nowrap;">serialize:将对象数据转换为具有定义的键和值的字符串这些方法的其他组通过magic__call方法实现,启用以下简洁的语法:</span></p><p><br/></p><p><span style="text-wrap: nowrap;">get<AttributeName>,例如$object->getPackagingOption()</span></p><p><span style="text-wrap: nowrap;">设置<AttributeName],例如$object->setPackagingOption('plastic_bag')uns<AttributeName></span></p><p><span style="text-wrap: nowrap;">[例如$object->unsPackagingOptions()具有<AttributeName',</span></p><p><span style="text-wrap: nowrap;">例如$bject->hasPackagingOption[(]要快速理解这种魔力,让我们手动创建如下所示的magelicious_core_log表:</span></p><pre class="brush:bash;toolbar:false">CREATE TABLE `magelicious_core_log` (`entity_id` int(10) unsigned NOT NULL AUTO_INCREMENT, `severity_level` varchar(24) NOT NULL, `note` text NOT NULL, `created_at` timestamp NOT NULL DEFAULT CURRENT_TIMESTAMP ON UPDATE CURRENT_TIMESTAMP, PRIMARY KEY(`entity_id`)) ENGINE = InnoDB DEFAULT CHARSET = utf8;</pre><p><span style="text-wrap: nowrap;">借助DataObject的魔力,我们空的Magelicious\Core\Model\Log模型仍然可以保存其数据,如下所示:</span></p><pre class="brush:cpp;toolbar:false">$log - > setCreatedAt(new\ DateTime()); $log - > setSeverityLevel('info'); $log - > setNote('Just Some Note'); $log - > save();</pre><p><span style="text-wrap: nowrap;">虽然这个例子会起作用,但它的作用远不止于此。手动创建表对于构建模块来说是不可行的。Magento对此有一个正确的机制,称为设置脚本。</span></p><p><br/><span style="text-wrap: nowrap;"></span></p>
<h5 style="color:red;">系统学习magento二次开发,推荐小册:<a style="color:blue;" href="https://www.maxiaoke.com/manual/magento_cn_dev.html" target="_blank">《Magento中文全栈二次开发 》</a></h5> <div class="image-container"> <p> <a style="color:blue;" href="https://www.maxiaoke.com/manual/magento_cn_dev.html" target="_blank"> <img src="https://www.maxiaoke.com/uploads/images/20230218/bb9c82995c24d1105676e02f373755f5.jpg" alt="Magento中文全栈二次开发"> </a> </p> </div> <div class="text-container" style="font-size:14px; color:#888"> <p>本小册面向Magento2以上版本,书代码及示例兼容magento2.0-2.4版本。涵盖了magento前端开发,后端开发,magento2主题,magento2重写,magento2 layout,magento2控制器,magento2 block等相关内容,带领您成为magento开发技术专家。</p> </div> <hr><p><span style="text-wrap: nowrap;">与EAV模型不同,创建简单的模型非常简单。让我们继续为Log实体创建一个模型、资源模型和集合。</span></p><p><span style="text-wrap: nowrap;">我们将首先创建<MAGELICIOUS_DIR>/Core/model/Log.php文件,其中包含以下内容:</span></p><pre class="brush:bash;toolbar:false">class Log extends\ Magento\ Framework\ Model\ AbstractModel { protected $_eventPrefix = 'magelicious_core_log'; protected $_eventObject = 'log'; protected function _construct() { $this - > _init(\Magelicious\ Core\ Model\ ResourceModel\ Log::class); } }</pre><p><span style="text-wrap: nowrap;">$_eventPrefix和$_eventObject的使用不是强制性的,但强烈建议使用。</span></p><p><span style="text-wrap: nowrap;">这些值由Magento\Framework\Model\AbstractModel事件调度器使用,并增加了我们模块未来的可扩展性。</span></p><p><span style="text-wrap: nowrap;">虽然Magento使用<ModuleName>_<ModelName>约定进行$_eventPrefix命名,但使用<VendorName>_<ModuleName>_<ModelName>可能更安全。</span></p><p><span style="text-wrap: nowrap;">按照约定,$_eventObject通常带有模型本身的名称。</span><span style="text-wrap: nowrap;">然后,我们创建<MAGELICIOUS_DIR>/Core/Model/ResourceModel/Log.php文件,其中包含以下内容:</span></p><p><span style="text-wrap: nowrap;"></span></p><p><span style="text-wrap: nowrap;">这里的_init方法采用两个参数:$mainTable参数的magelicious_core_log值和$idFieldName参数的entity_id值。</span></p><p><span style="text-wrap: nowrap;">$idFieldName是指定数据库中主列的名称。值得注意的是,magelicious_core_log表仍然不存在,但我们稍后将对此进行说明。</span><span style="text-wrap: nowrap;">然后,我们将创建<MAGELICIOUS_DIR>/Core/Model/ResourceModel/Log/Collection.php文件,其中包含以下内容:</span></p><pre class="brush:bash;toolbar:false">class Collection extends\ Magento\ Framework\ Model\ ResourceModel\ Db\ Collection\ AbstractCollection { protected function _construct() { $this - > _init(\Magelicious\ Core\ Model\ Log::class, \Magelicious\ Core\ Model\ ResourceModel\ Log::class); } }</pre><p><span style="text-wrap: nowrap;">这里的_init方法接受两个参数:$model和$resourceModel的字符串名称。Magento为此使用了<FULLY_QUALIFIED_CLASS_NAME>::CLASS语法,</span></p><p><span style="text-wrap: nowrap;">因为它使用了一个漂亮的解决方案,而不是四处传递类字符串。</span></p><p><br/></p>
<h5 style="color:red;">系统学习magento二次开发,推荐小册:<a style="color:blue;" href="https://www.maxiaoke.com/manual/magento_cn_dev.html" target="_blank">《Magento中文全栈二次开发 》</a></h5> <div class="image-container"> <p> <a style="color:blue;" href="https://www.maxiaoke.com/manual/magento_cn_dev.html" target="_blank"> <img src="https://www.maxiaoke.com/uploads/images/20230218/bb9c82995c24d1105676e02f373755f5.jpg" alt="Magento中文全栈二次开发"> </a> </p> </div> <div class="text-container" style="font-size:14px; color:#888"> <p>本小册面向Magento2以上版本,书代码及示例兼容magento2.0-2.4版本。涵盖了magento前端开发,后端开发,magento2主题,magento2重写,magento2 layout,magento2控制器,magento2 block等相关内容,带领您成为magento开发技术专家。</p> </div> <hr><p><span style="text-wrap: nowrap;">Magento有一个整洁的发布-订阅模式实现,我们称之为事件和观察者。通过在触发某些操作时调度事件,我们可以运行自定义代码来响应触发的事件。</span></p><p><span style="text-wrap: nowrap;">这些事件是使用Magento\Framework\event\Manager类调度的,该类实现了Magento\ Framework\event \ ManagerInterface。</span><span style="text-wrap: nowrap;">要调度事件,我们只需调用事件管理器实例的调度方法,为其提供我们正在调度的事件的名称以及我们希望传递给观察者的可选数据数组</span></p><p><span style="text-wrap: nowrap;">如下例所示,该示例取自<MAGENTO_DIR>/module-customer/Controller/Account/CreatePost.php文件:</span></p><pre class="brush:bash;toolbar:false">$this - > _eventManager - > dispatch('customer_register_success', ['account_controller' => $this, 'customer' => $customer]);</pre><p><span style="text-wrap: nowrap;">观察者是通过events.xml文件注册的,如<MAGENTO_DIR>/module persistent/etc/frontend/events.xml中的以下示例所示:</span></p><pre class="brush:bash;toolbar:false"><event name="customer_register_success"> <observer name="persistent" instance="Magento\Persistent\Observer\RemovePersistentCookieOnRegisterObserver" /> </event></pre><p><span style="text-wrap: nowrap;">通过在整个<MAGENTO_DIR>目录的*.php文件中查找eventManager->dispatch字符串,我们可以看到数百个事件示例,分布在MAGENTO的大多数模块中。</span></p><p><span style="text-wrap: nowrap;">虽然所有这些事件都具有相同的技术重要性,但我们可以说,其中一些事件可能比其他事件在日常基础上使用得更多。</span><span style="text-wrap: nowrap;">这使得花一些时间研究以下类及其发送的事件变得值得:Magento\Framework\App\Action\Action类,具有以下事件:</span></p><pre class="brush:bash;toolbar:false">controller_action_predispatch' controller_action_predispatch_' . $request->getRouteName()' controller_action_predispatch_' . $request->getFullActionName()' controller_action_postdispatch_' . $request->getFullActionName()' controller_action_postdispatch_' . $request->getRouteName() controller_action_postdispatch</pre><p><span style="text-wrap: nowrap;">Magento\Framework\Model\AbstractModel类,包含以下事件:</span></p><pre class="brush:bash;toolbar:false">model_load_before$this->_eventPrefix . '_load_before' model_load_after$this->_eventPrefix . '_load_after' model_save_commit_after$this->_eventPrefix . '_save_commit_after' model_save_before$this->_eventPrefix . '_save_before' model_save_afterclean_cache_by_tags$this->_eventPrefix . '_save_after' model_delete_before$this->_eventPrefix . '_delete_before' model_delete_afterclean_cache_by_tags$this->_eventPrefix . '_delete_after' model_delete_commit_after$this->_eventPrefix . '_delete_commit_after'$this->_eventPrefix . '_clear'</pre><p><span style="text-wrap: nowrap;">Magento\Framework\Model\ResourceModel\Db\Collection类,包含以下事件:</span></p><pre class="brush:bash;toolbar:false">core_collection_abstract_load_before $this->_eventPrefix . '_load_before' core_collection_abstract_load_after $this->_eventPrefix . '_load_after'</pre><p><span style="text-wrap: nowrap;">让我们仔细看看其中一个事件,该事件位于<MAGENTO_DIR>/framework/Model/AbstractModel.php文件中:</span></p><pre class="brush:bash;toolbar:false">public function afterCommitCallback() { $this - > _eventManager - > dispatch('model_save_commit_after', ['object' => $this]); $this - > _eventManager - > dispatch($this - > _eventPrefix. '_save_commit_after', $this - > _getEventData()); return $this; } protected function _getEventData() { return ['data_object' => $this, $this - > _eventObject => $this, ]; }</pre><p><span style="text-wrap: nowrap;">$_eventPrefix和$_eventObject类型属性在这里特别重要。如果我们浏览Magento\Catalog\Model\Product、Magento\Datalog\Module\Category、</span></p><p><span style="text-wrap: nowrap;">MagentoCustomer\Model\Customer、Magento \ Quote \ Model \ Quote等类型,</span></p><p><span style="text-wrap: nowrap;">Magento\Sales\Model\Order等,我们可以看到,这些实体类型中有很多本质上是从Magento\Framework\Model\AbstractModel扩展而来的,</span></p><p><span style="text-wrap: nowrap;">并提供了它们自己的值来取代$_eventPrefix=“core_abstract”和$_eventObject=“object”。</span></p><p><span style="text-wrap: nowrap;">这意味着我们可以使用诸如$this->_eventPrefix'之类的事件_save_commit_after'通过events.xml指定观察者。</span><span style="text-wrap: nowrap;">让我们看一下以下示例,该示例取自<MAGENTO_DIR>/module downloadable/etc/events.xml文件:</span></p><pre class="brush:bash;toolbar:false"><config> <event name="sales_order_save_commit_after"> <observer name="downloadable_observer" instance="Magento\Downloadable\Observer\SetLinkStatusObserver" /> </event> </config></pre><p><span style="text-wrap: nowrap;"></span></p><p><span style="text-wrap: nowrap;">观察者被放置在<ModuleDir>/Observer目录中。每个观察者在Magento\Framework\Event\ObserverInterface类上实现一个单独的执行方法:</span></p><pre class="brush:bash;toolbar:false">class SetLinkStatusObserver implements\ Magento\ Framework\ Event\ ObserverInterface { public function execute(\Magento\ Framework\ Event\ Observer $observer) { $order = $observer - > getEvent() - > getOrder(); } }</pre><p><span style="text-wrap: nowrap;">就像插件一样,实现不好的观察者很容易导致错误,甚至破坏整个应用程序。这就是为什么我们需要保持观测器的小型化和计算效率,以避免性能瓶颈。</span></p><p><span style="text-wrap: nowrap;">周期性事件循环是一个很容易陷入的陷阱。当观察者在某个时刻调度其侦听的同一事件时,就会发生这种情况。</span></p><p><span style="text-wrap: nowrap;">例如,如果观察者侦听model_save_before事件,然后试图在观察者中再次保存同一实体,这将触发循环事件循环。</span></p><p><span style="text-wrap: nowrap;"></span></p><p><span style="text-wrap: nowrap;">为了使我们的观察者尽可能具体,我们需要在适当的范围内宣布他们:</span></p><p><span style="text-wrap: nowrap;">对于只观察前端的事件,您可以在<ModuleDir>/etc/frontend/events.xml中声明观察者对于只观察后端的事件</span></p><p><span style="text-wrap: nowrap;">可以在<ModuleDir>/etc/adminhtml/events.xml</span></p><p><span style="text-wrap: nowrap;"></span></p><p><span style="text-wrap: nowrap;">为了观察全局事件,您可以在<ModuleDir>/etc/events.xml中声明观察者。与插件不同,观察者用于触发后续功能,</span></p><p><span style="text-wrap: nowrap;">而不是更改作为其观察事件一部分的函数或数据的行为。</span></p><p><br/><span style="text-wrap: nowrap;"></span></p>
<h5 style="color:red;">系统学习magento二次开发,推荐小册:<a style="color:blue;" href="https://www.maxiaoke.com/manual/magento_cn_dev.html" target="_blank">《Magento中文全栈二次开发 》</a></h5> <div class="image-container"> <p> <a style="color:blue;" href="https://www.maxiaoke.com/manual/magento_cn_dev.html" target="_blank"> <img src="https://www.maxiaoke.com/uploads/images/20230218/bb9c82995c24d1105676e02f373755f5.jpg" alt="Magento中文全栈二次开发"> </a> </p> </div> <div class="text-container" style="font-size:14px; color:#888"> <p>本小册面向Magento2以上版本,书代码及示例兼容magento2.0-2.4版本。涵盖了magento前端开发,后端开发,magento2主题,magento2重写,magento2 layout,magento2控制器,magento2 block等相关内容,带领您成为magento开发技术专家。</p> </div> <hr><p><span style="text-wrap: nowrap;">顾名思义,after插件是在观察到的方法之后运行的。在编写after插件时,有几个要点需要记住:</span></p><p><span style="text-wrap: nowrap;">传递给插件的第一个参数是一个观察到的类型实例。进入插件的第二个参数是观察到的方法的结果,通常调用$result或在从observed方法返回的变量之后调用(如下面的示例:$data)。</span></p><p><span style="text-wrap: nowrap;">所有其他参数都是observe方法的参数。插件必须返回相同类型的$result|$data变量,因为我们可以自由修改值。</span><span style="text-wrap: nowrap;">让我们来看看Magento的一个插件后实现,该实现在模块目录/etc/di.xml文件中指定:</span></p><pre class="brush:bash;toolbar:false"><type name="Magento\Indexer\Model\Config\Data"> <plugin name="indexerProductFlatConfigGet" type="Magento\Catalog\Model\Indexer\Product\Flat\Plugin\IndexerConfigData" /> </type></pre><p><span style="text-wrap: nowrap;">此插件的原始目标方法是Magento\Indexer\Model\Config\Data类的get方法:</span></p><pre class="brush:bash;toolbar:false">public function get($path = null, $default = null) { // The rest of the code... return $data;}</pre><p><span style="text-wrap: nowrap;">after插件的实现是通过Magento\Catalog\Model\Indexer\Product\Flat\plugin\IndexerConfigData类的afterGet方法提供的,如以下部分示例所示:</span></p><pre class="brush:bash;toolbar:false">public function afterGet(Magento\Indexer\Model\Config\Data, $data, $path = null, $default = null) { // The rest of the code... return $data;}</pre><p><span style="text-wrap: nowrap;">使用插件时应特别小心。虽然它们提供了很大的灵活性,但也很容易引发错误、性能瓶颈和其他不太明显的不稳定性——如果几个插件都在观察相同的方法,情况更是如此。</span></p>
<h5 style="color:red;">系统学习magento二次开发,推荐小册:<a style="color:blue;" href="https://www.maxiaoke.com/manual/magento_cn_dev.html" target="_blank">《Magento中文全栈二次开发 》</a></h5> <div class="image-container"> <p> <a style="color:blue;" href="https://www.maxiaoke.com/manual/magento_cn_dev.html" target="_blank"> <img src="https://www.maxiaoke.com/uploads/images/20230218/bb9c82995c24d1105676e02f373755f5.jpg" alt="Magento中文全栈二次开发"> </a> </p> </div> <div class="text-container" style="font-size:14px; color:#888"> <p>本小册面向Magento2以上版本,书代码及示例兼容magento2.0-2.4版本。涵盖了magento前端开发,后端开发,magento2主题,magento2重写,magento2 layout,magento2控制器,magento2 block等相关内容,带领您成为magento开发技术专家。</p> </div> <hr><p><span style="text-wrap: nowrap;">around插件围绕观察到的方法运行,使我们能够在原始方法调用前后运行一些代码。这是一个非常强大的概念,因为我们可以更改传入的参数以及函数的返回值。</span></p><p><span style="text-wrap: nowrap;">在编写around插件时,有几个关键点需要记住:</span></p><p><span style="text-wrap: nowrap;">传递给插件的第一个参数是观察到的类型实例。进入插件的第二个参数是可调用/Closure。通常,此参数的类型和名称为可调用$proceed。</span></p><p><span style="text-wrap: nowrap;">我们必须确保将与原始方法签名相同的参数转发到此可调用对象。</span></p><p><span style="text-wrap: nowrap;">所有其他参数都是原始观察到的方法的参数。插件必须返回与原始函数相同的值,理想情况下返回$proceed(…)或$returnValue=$processed();</span></p><p><span style="text-wrap: nowrap;">然后是$returnValue;对于需要修改$returnValue的情况。</span></p><p><span style="text-wrap: nowrap;">让我们来看看Magento的一个插件实现,该实现在<Magento_DIR>模块分组产品/etc/di.xml文件中指定:</span></p><pre class="brush:bash;toolbar:false"><type name="Magento\Catalog\Model\ResourceModel\Product\Link"> <plugin name="groupedProductLinkProcessor" type="Magento\GroupedProduct\Model\ResourceModel\Product\Link\RelationPersister" /> </type></pre><p><span style="text-wrap: nowrap;">此插件的原始方法以Magento\Catalog\Model\ResourceModel\Product\Link类的deleteProductLink方法为目标:</span></p><pre class="brush:bash;toolbar:false">public function deleteProductLink($linkId) { return $this - > getConnection() - > delete($this - > getMainTable(), ['link_id = ?' => $linkId]); }</pre><p><span style="text-wrap: nowrap;">around插件的实现是通过Magento\GroupedProduct\Model\ResourceModel\Product\Link\RelationPersister类的aroundDeleteProductLink方法提供的</span></p><p><span style="text-wrap: nowrap;">如以下部分示例所示:</span></p><pre class="brush:bash;toolbar:false">function aroundDeleteProductLink(\Magento\ GroupedProduct\ Model\ ResourceModel\ Product\ Link $subject, \Closure $proceed, $linkId) { // The rest of the code... $result = $proceed($linkId); // The rest of the code... return $result;</pre><p></p>
<h5 style="color:red;">系统学习magento二次开发,推荐小册:<a style="color:blue;" href="https://www.maxiaoke.com/manual/magento_cn_dev.html" target="_blank">《Magento中文全栈二次开发 》</a></h5> <div class="image-container"> <p> <a style="color:blue;" href="https://www.maxiaoke.com/manual/magento_cn_dev.html" target="_blank"> <img src="https://www.maxiaoke.com/uploads/images/20230218/bb9c82995c24d1105676e02f373755f5.jpg" alt="Magento中文全栈二次开发"> </a> </p> </div> <div class="text-container" style="font-size:14px; color:#888"> <p>本小册面向Magento2以上版本,书代码及示例兼容magento2.0-2.4版本。涵盖了magento前端开发,后端开发,magento2主题,magento2重写,magento2 layout,magento2控制器,magento2 block等相关内容,带领您成为magento开发技术专家。</p> </div> <hr><p>magento2的插件机制允许我们对指定方法运行之前或者之后对该方法进行动态修改,包括对方法的参数、返回值等。</p><p>本篇文章我们为大家介绍一下magento2中的Plugin机制中的before方法。</p><p><span style="text-wrap: nowrap;">before插件,顾名思义,在观察到的方法之前运行。在编写before plugin时,有几个要点需要记住:</span></p><p><span style="text-wrap: nowrap;">before关键字被附加到observedinstance方法中。如果观察到的方法被调用getSomeValue,那么插件方法被调用beforeGetSomeValue。</span></p><p><span style="text-wrap: nowrap;">before-plugin方法的第一个参数始终是观察到的实例类型,通常缩写为$subject或直接由类类型缩写——在我们的示例中是$processor。</span></p><p><span style="text-wrap: nowrap;">为了提高可读性,我们可以对其进行类型转换。插件方法的所有其他参数必须与观察到的方法的参数匹配。</span></p><p><span style="text-wrap: nowrap;">插件方法必须返回一个数组,该数组的参数类型和数量与观察到的方法的输入参数相同。让我们来看看Magento在插件实现之前的一个,</span></p><p><span style="text-wrap: nowrap;">即<Magento_DIR>模块支付/etc/frontend/di.xml文件中指定的一个:</span></p><pre class="brush:bash;toolbar:false"><type name="Magento\Checkout\Block\Checkout\LayoutProcessor"> <plugin name="ProcessPaymentConfiguration" type="Magento\Payment\Plugin\PaymentConfigurationProcess"/> </type></pre><p><span style="text-wrap: nowrap;">此插件的原始目标方法是Magento\Checkout\Plock\Checkout\LayoutProcessor类的处理方法:</span></p><pre class="brush:bash;toolbar:false">public function process($jsLayout) { // The rest of the code... return $jsLayout;}</pre><p><span style="text-wrap: nowrap;">before插件的实现是通过Magento\Payment\plugin\PaymentConfigurationProcess类的beforeProcess方法提供的,如以下部分示例所示:</span></p><pre class="brush:bash;toolbar:false">public function beforeProcess( \Magento\ Checkout\ Block\ Checkout\ LayoutProcessor $processor, $jsLayout ) { // The rest of the code... return [$jsLayout];}</pre><p><br/></p>
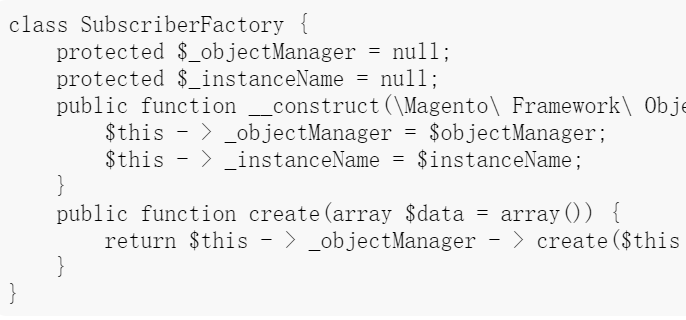
<h5 style="color:red;">系统学习magento二次开发,推荐小册:<a style="color:blue;" href="https://www.maxiaoke.com/manual/magento_cn_dev.html" target="_blank">《Magento中文全栈二次开发 》</a></h5> <div class="image-container"> <p> <a style="color:blue;" href="https://www.maxiaoke.com/manual/magento_cn_dev.html" target="_blank"> <img src="https://www.maxiaoke.com/uploads/images/20230218/bb9c82995c24d1105676e02f373755f5.jpg" alt="Magento中文全栈二次开发"> </a> </p> </div> <div class="text-container" style="font-size:14px; color:#888"> <p>本小册面向Magento2以上版本,书代码及示例兼容magento2.0-2.4版本。涵盖了magento前端开发,后端开发,magento2主题,magento2重写,magento2 layout,magento2控制器,magento2 block等相关内容,带领您成为magento开发技术专家。</p> </div> <hr><p><span style="text-wrap: nowrap;">工厂是创建其他类的类,很像对象管理器,只是这次我们被鼓励直接使用它们。</span></p><p><span style="text-wrap: nowrap;">它们的目的是实例化不可注入的类——那些我们不应该直接注入到__construct中的类。</span></p><p><span style="text-wrap: nowrap;">使用工厂的美妙之处在于,大多数时候,我们甚至不必编写它们,因为它们是由Magento自动生成的,</span></p><p><span style="text-wrap: nowrap;">除非我们需要为工厂类实现某种特定的行为。</span><span style="text-wrap: nowrap;">通过在整个<MAGENTO_DIR>目录的*.php文件中查找Factory$字符串,</span></p><p><span style="text-wrap: nowrap;">我们可以看到数千个工厂示例,分布在MAGENTO的大多数模块中。</span><span style="text-wrap: nowrap;">虽然这些工厂中有很多是实际存在的,</span></p><p><span style="text-wrap: nowrap;">但其他工厂是在需要时自动生成的。</span><span style="text-wrap: nowrap;">让我们快速了解一个自动生成的工厂,即Magento\Newsletter\Model\SubscriberFactory,</span></p><p><span style="text-wrap: nowrap;">它用于几个Magento模块,如新闻稿、订户和评论模块:</span></p><pre class="brush:bash;toolbar:false">class SubscriberFactory { protected $_objectManager = null; protected $_instanceName = null; public function __construct(\Magento\ Framework\ ObjectManagerInterface $objectManager, $instanceName = '\\Magento\\Newsletter\\Model\\Subscriber') { $this - > _objectManager = $objectManager; $this - > _instanceName = $instanceName; } public function create(array $data = array()) { return $this - > _objectManager - > create($this - > _instanceName, $data); } }</pre><p><span style="text-wrap: nowrap;">自动生成的工厂代码本质上只是对象管理器创建方法之上的一个薄包装。</span></p><p><span style="text-wrap: nowrap;">工厂与di.xml首选项机制配合良好,这意味着我们可以很容易地将接口传递到构造函数中,如下所示:</span></p><pre class="brush:bash;toolbar:false">public function __construct(\Magento\ CatalogInventory\ Api\ StockItemRepositoryInterface $stockItemRepository, \Magento\ CatalogInventory\ Api\ StockItemCriteriaInterfaceFactory $stockItemCriteriaFactory) { $this - > stockItemRepository = $stockItemRepository; $this - > stockItemCriteriaFactory = $stockItemCriteriaFactory; } // $criteria = $this->stockItemCriteriaFactory->create();// $result = $this->stockItemRepository->getList($criteria);</pre><p><span style="text-wrap: nowrap;">首选项机制确保在调用对象实例的构造函数时将具体实现传递给对象实例。</span></p><p><span style="text-wrap: nowrap;">在开发人员模式下,Magento执行自动编译,这意味着对di.xml的更改将自动获取。</span></p><p><span style="text-wrap: nowrap;">然而,有时,如果我们偶然发现意外的结果,运行bin/magento setup:di:compile控制台命令,</span></p><p><span style="text-wrap: nowrap;">甚至手动清除生成的文件夹(rm-rf-generated/*)可能有助于解决问题。</span></p><p><br/><span style="text-wrap: nowrap;"></span></p>
<h5 style="color:red;">系统学习magento二次开发,推荐小册:<a style="color:blue;" href="https://www.maxiaoke.com/manual/magento_cn_dev.html" target="_blank">《Magento中文全栈二次开发 》</a></h5> <div class="image-container"> <p> <a style="color:blue;" href="https://www.maxiaoke.com/manual/magento_cn_dev.html" target="_blank"> <img src="https://www.maxiaoke.com/uploads/images/20230218/bb9c82995c24d1105676e02f373755f5.jpg" alt="Magento中文全栈二次开发"> </a> </p> </div> <div class="text-container" style="font-size:14px; color:#888"> <p>本小册面向Magento2以上版本,书代码及示例兼容magento2.0-2.4版本。涵盖了magento前端开发,后端开发,magento2主题,magento2重写,magento2 layout,magento2控制器,magento2 block等相关内容,带领您成为magento开发技术专家。</p> </div> <hr><p>magento2中的proxy是一种设计模式,比较难于理解,本篇内容将为大家介绍magento2中的代理模式:proxy<br/></p><p><span style="text-wrap: nowrap;">当对象创建成本很高,并且类的构造函数占用了大量资源时,就会使用代理类。为了避免不必要的性能影响,</span></p><p><span style="text-wrap: nowrap;">Magento使用Proxy类将给定的类型变成它们的延迟加载版本。</span></p><p><span style="text-wrap: nowrap;">在所有Magento di.xml文件中快速查找\Proxy</argument>字符串可以发现该字符串出现了一百多次。</span></p><p><span style="text-wrap: nowrap;">可以说,Magento在其代码中广泛使用代理。</span></p><p><span style="text-wrap: nowrap;"><MAGENTO_DIR>/module-customer/etc/di.xml下的类型定义是使用代理的一个很好的例子:</span></p><pre class="brush:bash;toolbar:false"><type name="Magento\Customer\Model\Session"> <arguments> <argument name="configShare" xsi:type="object">Magento\Customer\Model\Config\Share\Proxy</argument> <argument name="customerUrl" xsi:type="object">Magento\Customer\Model\Url\Proxy</argument> <argument name="customerResource" xsi:type="object">Magento\Customer\Model\ResourceModel\Customer\Proxy</argument> <argument name="storage" xsi:type="object">Magento\Customer\Model\Session\Storage</argument> <argument name="customerRepository" xsi:type="object">Magento\Customer\Api\CustomerRepositoryInterface\Proxy</argument> </arguments> </type></pre><p><span style="text-wrap: nowrap;">如果我们查看Magento\Customer\Model\Session类型的构造函数,我们可以看到四个参数</span></p><p><span style="text-wrap: nowrap;">(configShare、customerUrl、customerResource和customerRepository)中,</span></p><p><span style="text-wrap: nowrap;">没有一个在PHP文件中声明为Proxy。</span><span style="text-wrap: nowrap;">它们是通过di.xml重写的。</span></p><p><span style="text-wrap: nowrap;">这些代理类型还不真正存在,因为Magento依赖注入(di)编译过程创建了它们。</span></p><p><span style="text-wrap: nowrap;">它们是在生成的目录下自动生成的。</span></p><p><span style="text-wrap: nowrap;">编译后,可以在生成的/code/Magento/Customer/Model/Url/Proxy.php</span></p><p><span style="text-wrap: nowrap;">文件下轻松找到Magento\Customer\Model\Url\Proxy.php类型。</span></p><p><span style="text-wrap: nowrap;">让我们局部来看一下:</span></p><pre class="brush:bash;toolbar:false"><?php class Proxy extends\ Magento\ Customer\ Model\ Url implements\ Magento\ Framework\ ObjectManager\ NoninterceptableInterface { public function __construct(\Magento\ Framework\ ObjectManagerInterface $objectManager, $instanceName = '\\Magento\\Customer\\Model\\Url', $shared = true) { $this - > _objectManager = $objectManager; $this - > _instanceName = $instanceName; $this - > _isShared = $shared; } public function __sleep() { return ['_subject', '_isShared', '_instanceName']; } public function __wakeup() { $this - > _objectManager = \Magento\ Framework\ App\ ObjectManager::getInstance(); } public function __clone() { $this - > _subject = clone $this - > _getSubject(); } protected function _getSubject() { if (!$this - > _subject) { $this - > _subject = true === $this - > _isShared ? $this - > _objectManager - > get($this - > _instanceName) : $this - > _objectManager - > create($this - > _instanceName); } return $this - > _subject; } public function getLoginUrl() { return $this - > _getSubject() - > getLoginUrl(); } public function getLoginUrlParams() { return $this - > _getSubject() - > getLoginUrlParams(); } }</pre><p><span style="text-wrap: nowrap;">Proxy类的组成显示了它包装原始Magento\Customer\Model\Url类型的机制。这意味着,在整个Magento中,</span></p><p><span style="text-wrap: nowrap;">每次请求Magento\Customer\Model\Url类型时,</span></p><p><span style="text-wrap: nowrap;">Magento\Customer\Module\Url\Proxy都会被传递。与原始类型的__construct方法(可能会影响性能)不同,</span></p><p><span style="text-wrap: nowrap;">自动生成代理的__construction方法是轻量级的。</span><span style="text-wrap: nowrap;">这消除了可能的性能瓶颈。_getSubject方法用于在调用任何原始类型的公共方法时,</span></p><p><span style="text-wrap: nowrap;">实例化/延迟加载原始类型。</span></p><p><span style="text-wrap: nowrap;">例如,对getLoginUrl方法的调用将通过代理。</span></p><p><span style="text-wrap: nowrap;">Magento生成的每个代理都实现了Magento\Framework\ObjectManager\NoninterceptableInterface。</span></p><p><span style="text-wrap: nowrap;">尽管接口本身是空的,但它被用作标识代理的标记,</span></p><p><span style="text-wrap: nowrap;">我们不需要为其生成拦截器(插件)。</span></p><pre class="brush:bash;toolbar:false">class Customer { public function __construct(\Magento\ Customer\ Model\ Url\ Proxy $customerUrl) { //... }}</pre><p><span style="text-wrap: nowrap;"></span></p><p><span style="text-wrap: nowrap;">然而,这种做法是一种糟糕的做法。正确执行此操作的方法是使用原始Magento\Customer\Model\Url类型指定__construct,</span></p><p><span style="text-wrap: nowrap;">然后按如下方式添加di.xml:</span></p><pre class="brush:bash;toolbar:false"><type name="Magelicious\Core\Model\Customer"> <arguments> <argument name="customerUrl" xsi:type="object">Magento\Customer\Model\Url\Proxy</argument> </arguments> </type></pre><p><span style="text-wrap: nowrap;"></span></p><p><span style="text-wrap: nowrap;"></span></p>